...
This method is just as easily attached to a complete etl refresh; this is actually covered in more detail on the full build here :Part 4: A Data and workbook refresh: complete build (20 minute read) - On a Tableau Quest... - Confluence (atlassian.net). Though for this page, I'll be just looking at the print to pdf and send though with a slight twist, as here we'll use some parameters to control the dashboard before printing. These controls are just as easily added to any build.
The Build
Step 1: Dashboard
Lets build a dashboard, using Superstore Sales, something simple then:
...
Now save the workbook as a packaged workbook call it Superstore.twbx and upload your workbook to your server, and take a note of workbook and sheet name as given by the server on upload, mine is "superstore/Dashboard1".
Step 2: Script
As with everything in tabcmd, here, we shall create a script to instruct tabcmd on what to build.
...
Now save the script as superstore_daily.bat in your tabcmd scripts folder
Step 3: The ETL
I shall be using part of the demo from Part 4 here:
...
- Drag an Execute Process Task onto the canvas: this shall execute the batch file to export the two pages as png to your prints "C:\tabcmd\prints" folder.
- Name: Print daily pages
- On the Process page
- Executable: C:\tabcmd\scripts\company_kpi_daily_print.bat
- WindowStyle: Minimized
- Press OK
- Now drag a Send MailTask object onto the canvas: this will send the email to your recipients. You can use SSIS to create detailed messages containing any error codes you have recorded based on your logging, but for this example, we'll stick with hard-coding the fields
- Name: Send the summary page to the DL - you don't need a distribution list here, though it is more usual within a business to maintain them
- Onto the Mail page
- SmtpConnection: You will need to speak to your IT team as regards these details
- From: You
- To: Recipients and/or distribution list
- Cc, BCc, Subject: Populate with your requirements
- MessageSource: <Message Body>
- Attachments: Navigate to the prints produced by Tableau Server (superstore_high.png; superstore_central.png)
- Press OK
- Connect the Print workbook summary page to the Send the summary page to the DL
Step 4: Deployment
Now we have created the print-to-pdf/png and the email out, the final step is to deploy. Again, I use SQL Server for this; if you don't have access to the server, the Developer Edition is free both for personal and commercial use, but is severely throttled on performance: not too great for database servicing, but more than enough power for etl work like this.
...
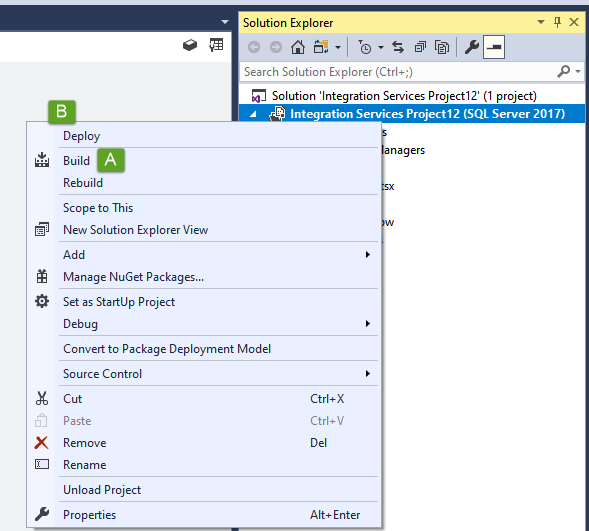
- From the Solution Explorer panel to the right - this might need to be expanded, right mouse the project and then
First select Build to build the project config, this can take some time depending on the project size, but for this project, the build should be immediate with information included in the Output window:
Paste code macro language tex Build complete -- 0 errors, 0 warnings ========== Build: 1 succeeded or up-to-date, 0 failed, 0 skipped ==========
- Back onto the Solution Explorer, now its time to Deploy
- Press Next on the initial Deployment Wizard screen, the Source shall be skipped as it is this project you are deploying, though you can always go back to the Source selection from the Destination page
- Insert your Server name
- Complete your credentials to login to the server
- Path - this is the path to you SSISDB catalogue, hit browse to open the catalogue
- Ensure your catalogue is selected
- Then create a new folder for this project
- Followed by OK
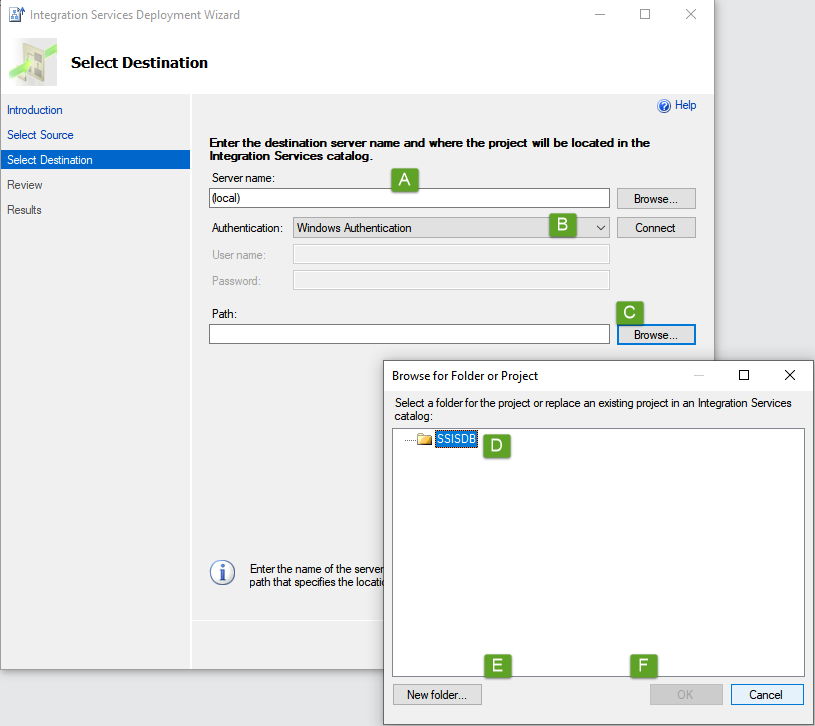
- The path to your new folder shall now be in the Path field, press Next to be taken to the review page
- All being well, press deploy, once the project has been deployed, Close the deployment window
Step 5: Scheduling
Over to SQL Server Management Studio, refreshing the Integration Services Catalogs will show you your newly deployed project; you won't need to do anything more here but if you were using sql parameters (not the same as Tableau parameters), this is where you can set them up.
Expanding the SQL Server Agent, this is where we shall create the job(s):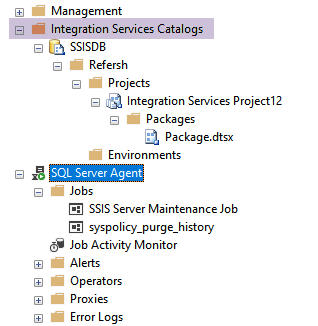
...