Part 2: A Programmatic Workbook Refresh
In this article, I shall demonstrate creating an automated routine that can be deployed to SQL Server to programmatically refresh your workbooks outside of Tableau Server's basic refresh function.
The following assumptions have been made:
- You have deployed Tabcmd: Instructions here
- You have an instance of SQL Server installed (minimum Developer Edition) to the server and have deployed a copy of SSIS to your local system: Installing SSIS
- You have a directory in the root of your Tabcmd directory where you can save and execute bat files: Instructions
Imagine the situation:
You have built your workbook, it has been signed-off and is now in production. It contains mission-critical data used by the leadership team each morning to determine the days' activity. So, on speaking with engineering (if you didn't build the etl's that land the data), you find the data has finished refreshing around: 04:30 each morning. The workbook takes around 10 minutes to refresh, and the leadership team do not need to access the report until 06:00 at the earliest, giving you 90 minutes in order to get the workbook refreshed, so to be safe, you set Tableau Server to refresh the workbook at 05:15 each day.
This has been working fine for the last few days/weeks/months, but then all of a sudden, the workbook begins to contain no data. Sure, the static headers, captions, logos and parameters are there, but there is no data. What has happened? A quick check locally on your machine shows the table is still there, and your workbook shows the latest result, so there are no broken data. You can still locally refresh the workbook, and, successfully execute a manual refresh of the workbook on TS so this all seems fine. You are able to rule-out issues with:
- Data access
- Data table
- Data structure
- Networking pipelines
- Database spooling
- Security
And Tableau Server is reporting the refresh did run successfully.
You cannot find the cause of the problem, and the leadership team are beginning to lose faith in your report.
Sound familiar? Or at least, does this sound like a scenario that you would like to avoid?
Upon further investigation, it is found that due to a new data stream, the etl refresh is now taking 1 hour longer than it originally did, meaning the data is now not going to be ready for querying until 05:30 at the earliest. Still time for Tableau Server (TS) to refresh your workbook with an adjusted schedule, but why was TS reporting a successful refresh before, when it is clear that no data is being loaded.
So what happened?
More to the point, why is TS reporting a successful refresh when it is clear that no such refresh took place?
Answer: Simply because the refresh was successful.
Tableau Server is unable to test whether there are any data in the table(s).
The refresh schedule is only an instruction to to refresh the workbook at a given time, the fact that no data was present in the table due to the current etl process makes no difference to TS, it was instructed to carry-out a command at a given time, and so it did.
So what are my options to resolving this?
At the time of writing, the latest version of Tableau Server (v2019.4) has but one option: Either set a later refresh schedule, at a time when the data is guaranteed to be ready and / or set a second (or more) refresh at a later time as a catch-all.
The problem here is that should the data be late, your users may be looking at and making decisions on data from the previous refresh; so unless you have a last refresh date/time caption (which is always a great idea anyway), you run the risk of users seeing two competing data at different times of the day, unless you specifically inform that the report can only be used after a set-time.
An alternative
Would be to use an alternate method to initiate the refresh, one that can be relied upon to use logic to determine when a refresh should take place, thus limiting the number of refreshes a workbook must undertake, and, ensuring your users see only one single-version of the truth.
Using Tabcmd with an etl tool.
Programatic refreshes using Tabcmd combined with an etl tool
You do not need to be using SQL Server as your main data platform, neither do you need to migrate your data to it, in order to use this method.
I usually create a refresh log table which can comfortably live in a database on the Developer Edition platform, used to initiate refreshes when either:
- Modifying ETL routines is not possible
- The data platform is not SQL Server, so we need to be querying over a connected pipeline
- Access to proprietary ETL tools (such as Informatica) is restricted purely to the engineering team, thus preventing its use in other areas of the business
Follow this step-by-step tutorial on building the refresh
We shall be building and deploying a workbook refresh only function here, which shall be added to the MS Server Agent schedule as a step after a data refresh, although, it is also just as fine to build this direct to the data etl routine. I tend to advise against this, simply due to ease of use: if you need to perform a manual execution, or want to include this refresh in a much larger refresh all workbooks job, by having this as a separate package, access is a lot more easier.
Step 1: The Refresh File
Lets begin first by creating an executable file, this will contain all the commands needed to initiate the refresh, and, you can even initiate the refresh simply by clicking the file:
Enter these commands into a new text file, and save as: refresh.bat inside your c:\tabcmd\actions directory:
- Ensure you have moved the tabcmd working directory to the root (c:\)
- Overwrite everything including the angle brackets with your config
- Do not delete the double-quotes surrounding the name of your workbook
- Always terminate your session at the conclusion of your commands by logging-off
- Whilst not demonstrated here, you can perform multiple actions in a session before terminating
- The login information is un-masked text
Step 2: The Automation
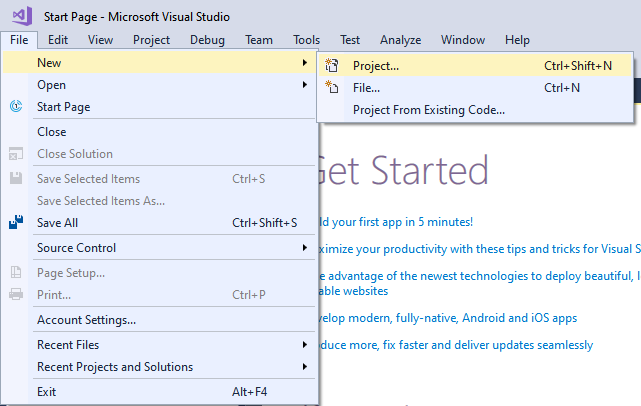
- Load an instance of SSIS from with MS SSDT:
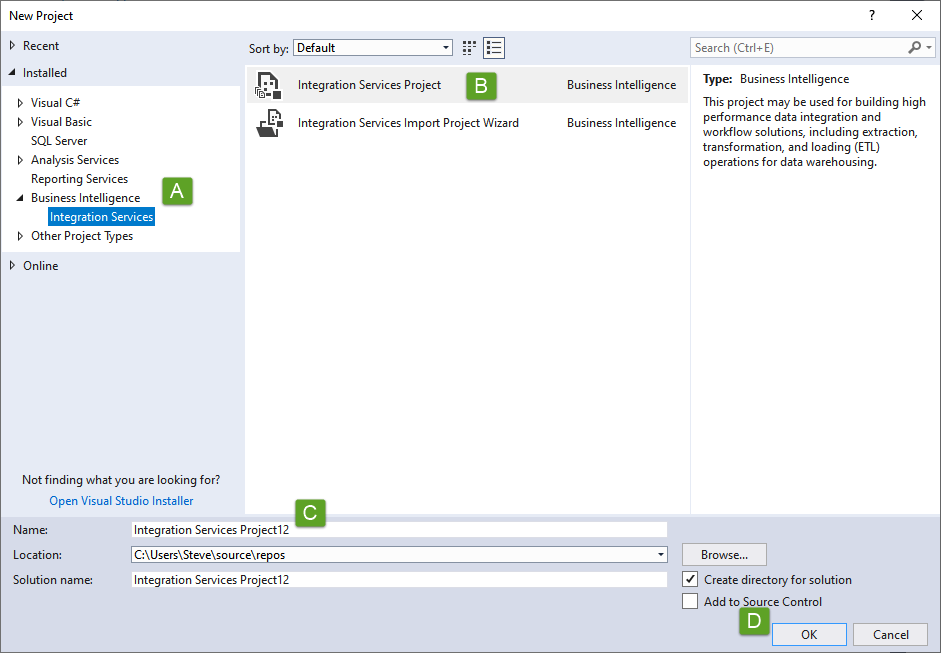
- From within the window:
- Select Integration Services from the Business Intelligence sub-menu
- Select Integration Services Project
- Name your project: replace spaces with underscores - AVOID camelCase
- Press OK to open the dev environment
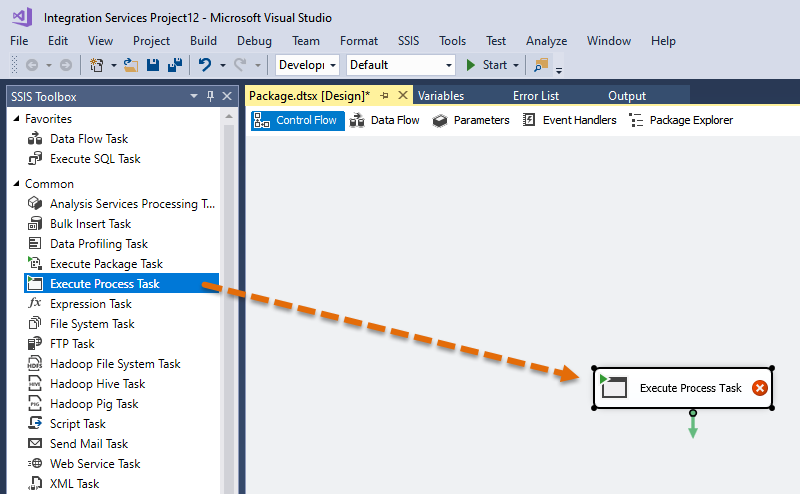
- Drag an Execute Process task from the toolbox to the dev window (similar layout to Tableau)
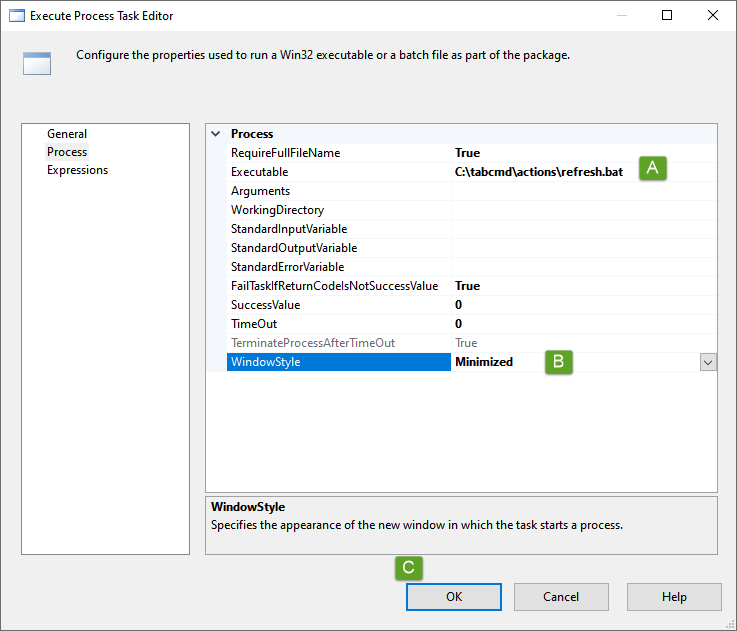
- Now right-mouse the task object and select Edit, before dropping onto the Process page of the window
- Now populate as:
- Path to the executable
- Change the window style to Minimized
- Press OK to save
- On closing and return to the main dev panel, the object should lose its red cross indicating the project has parsed successfully
- Now Save the project
Step 3: Deployment
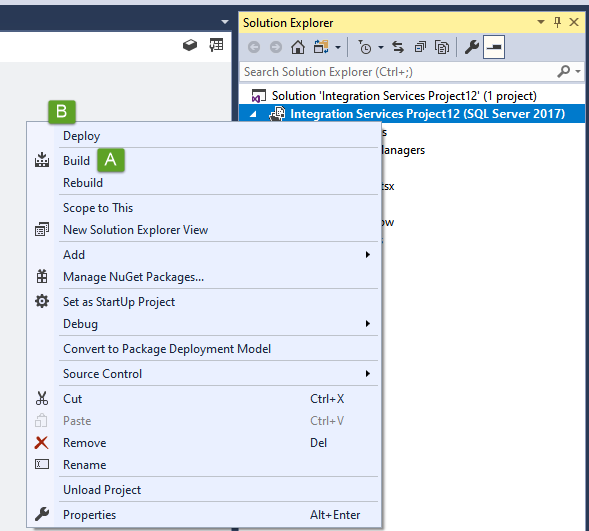
- From the Solution Explorer panel to the right - this might need to be expanded, right mouse the project and then
First select Build to build the project config, this can take some time depending on the project size, but for this project, the build should be immediate with information included in the Output window:
- Back onto the Solution Explorer, now its time to Deploy
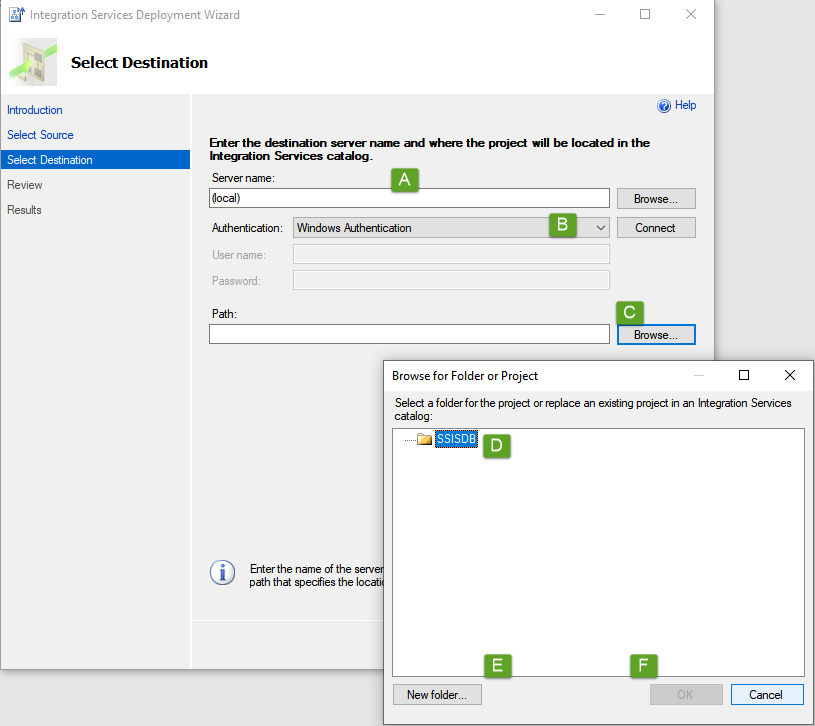
- Press Next on the initial Deployment Wizard screen, the Source shall be skipped as it is this project you are deploying, though you can always go back to the Source selection from the Destination page
- Insert your Server name
- Complete your credentials to login to the server
- Path - this is the path to you SSISDB catalogue, hit browse to open the catalogue
- Ensure your catalogue is selected
- Then create a new folder for this project
- Followed by OK
- The path to your new folder shall now be in the Path field, press Next to be taken to the review page
- All being well, press deploy, once the project has been deployed, Close the deployment window
Step 4: Scheduling
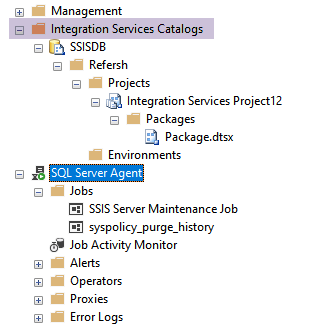
Over to SQL Server Management Studio, refreshing the Integration Services Catalogs will show you your newly deployed project; you won't need to do anything more here but if you were using sql parameters (not the same as Tableau parameters), this is where you can set them up.
Expanding the SQL Server Agent, this is where we shall create the job(s):
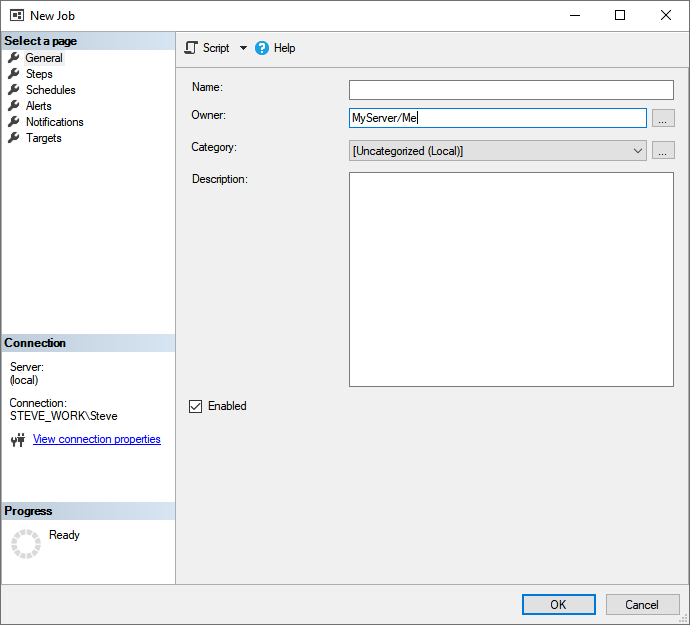
- Right mouse Jobs and select New Job... from the context menu
- Complete the basic details on the General page before selecting Steps
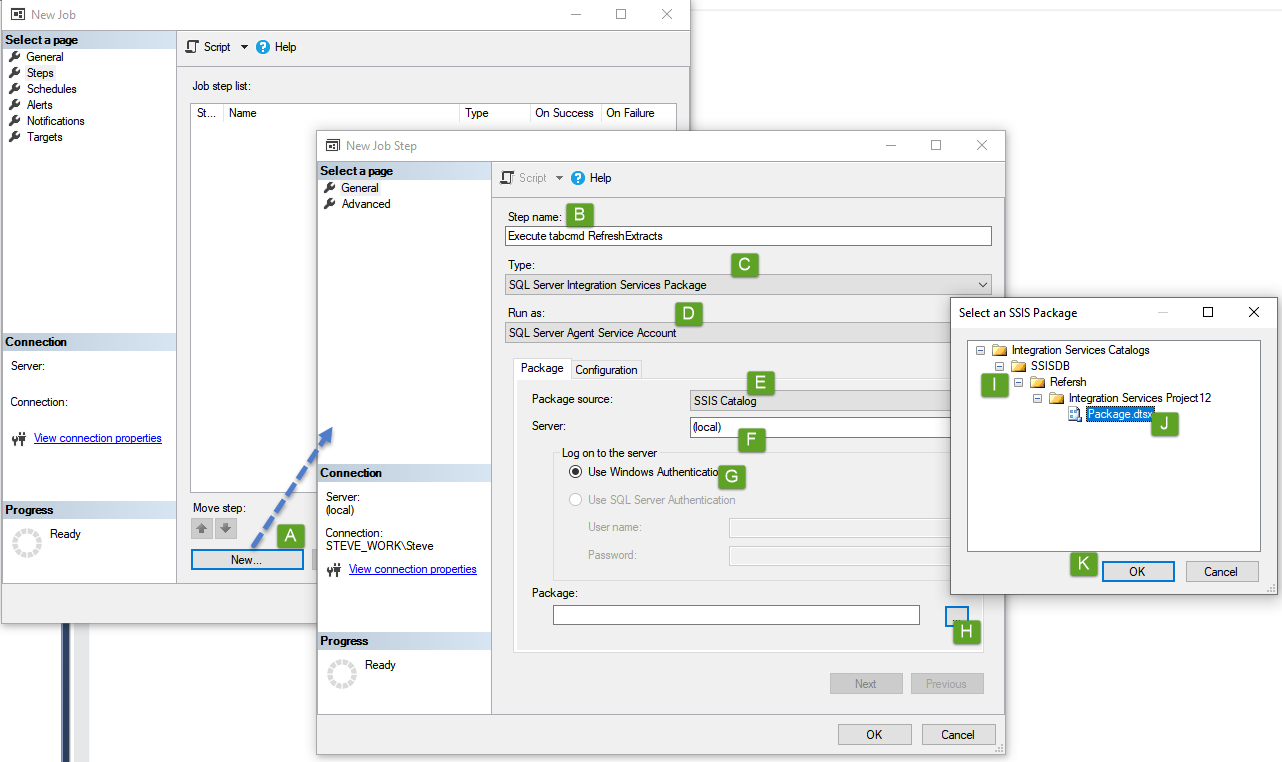
- From the Steps page:
- Press New... to open the new instruction dialogue
- Give the step a name
- From the drop-down, select SQL Server Integration Services Package
- Run As will automatically set SQL Server Agent Service Account
- Package Source will automatically default to SSIS Catalog
- Set your server here - this allows us to execute packages that have been deployed to other servers
- Set your logon credentials
- Press the ellipses at the end of the Package command box to expand the SSISDB of the selected server
- Expand the catalogue to find your project folder, then project, and lastly, the package
- Select the package to highlight it and press OK to add the path to the package to the Package command box
The Advanced page of the New Step dialogue box provides more configuration surrounding how to handle timeouts, but also what to do next; as this is a single-step demo, we can avoid this page. Press OK to add the step
- Finally, from the Schedules page, press New... to open the scheduling window, define your schedule here, pressing OK to add, followed by OK on the scheduling page to create the job and close the dialogue
Now that you've created your job, it shall run to your defined schedule, which can be easily modified at any time, but, you can also manually initiate the job simply by right mouse selecting the job from the Jobs directory, before then selecting Start Job at Step...
